Butternut Squash Soup
A beautiful reminder holiday season is here.
 Butternut Squash Soup Shooters - Caylena 2016.
Growing up in California I enjoyed Thanksgiving, though it wasn’t until my first East Coast Thanksgiving in 1999, that I truly fell in love with the Holiday Season! Weather changes, seasonality of food, and traditions that really have made it all the more special! I look forward to Butternut Squash Soup season every year! Now that it has become part of my tradition, I enjoy it wherever I am.
I’ve made butternut squash soup a dozen different ways thru the years, have eaten it more so… this recipe is generally my go to and favorite. I tend to make this one with a bit more herb and spice to even out that sweetness from the squash. This is a great way to start a party off as a shooter like above as people arrive - which is also easier for hosting and cleaning after. Or you can serve it more traditionally in a bowl for sit down of course. Either way, it’s a wonderful start to a festive gathering.
Butternut Squash Soup Shooters - Caylena 2016.
Growing up in California I enjoyed Thanksgiving, though it wasn’t until my first East Coast Thanksgiving in 1999, that I truly fell in love with the Holiday Season! Weather changes, seasonality of food, and traditions that really have made it all the more special! I look forward to Butternut Squash Soup season every year! Now that it has become part of my tradition, I enjoy it wherever I am.
I’ve made butternut squash soup a dozen different ways thru the years, have eaten it more so… this recipe is generally my go to and favorite. I tend to make this one with a bit more herb and spice to even out that sweetness from the squash. This is a great way to start a party off as a shooter like above as people arrive - which is also easier for hosting and cleaning after. Or you can serve it more traditionally in a bowl for sit down of course. Either way, it’s a wonderful start to a festive gathering.
 This is a very easy dish to make. Take your time and make it right. Follow the steps, there are a lot, and be patient while the flavors develop. You should make it in advance so that it’s not worrisome the day of. This reheats well and time allows the flavors to mature. If it’s too thick you just add a bit of stock while reheating.
For the garnish - you can get as creative as you’d like. I love to serve it with duck or squab confit! That of course is very elegant, you can roast pumpkin seeds or others and add spice to them, fried sage, or here simple chives over crème fraîche with nutmeg, is simply perfect.
This is a very easy dish to make. Take your time and make it right. Follow the steps, there are a lot, and be patient while the flavors develop. You should make it in advance so that it’s not worrisome the day of. This reheats well and time allows the flavors to mature. If it’s too thick you just add a bit of stock while reheating.
For the garnish - you can get as creative as you’d like. I love to serve it with duck or squab confit! That of course is very elegant, you can roast pumpkin seeds or others and add spice to them, fried sage, or here simple chives over crème fraîche with nutmeg, is simply perfect.
Ingredients
Serves 6, x3 if serving as shooters Difficulty: Moderate/Easy
*Note in my pictures, the recipe is doubled.
-
3lbs - 4lbs Butternut Squash. (1 large or 2 smalls)
-
6-8 cups Veg broth (I use Chicken broth)
-
Reserve 2 cups for reheating
-
2 large Leeks - white & green parts thinly sliced
-
1 large White Onion - diced
-
2 medium Carrots - diced
-
2 medium Shallots - diced (same amount as onion)
-
6 cloves Garlic - crushed
-
4 Sage sprigs
-
1 Bouquet Garni ( in cheesecloth wrap: 8 sprigs Thyme, 4 sprigs Parsley, 2 Bay leaves, ½ tsp Black Peppercorns)
-
4 Tbsp Olive Oil Blend -or- Canola Oil
-
4 Tbsp Unsalted Butter
-
2 Tbsp Honey
-
1 tsp Cayenne Pepper
-
½ tsp ground Nutmeg
-
Salt & Ground Pepper - plenty! Don’t be stingy!
 Garnish: ¼ cup Crème fraîche & 1 tsp ground Nutmeg mixed together - kept cool.
-
Chopped Chives & Olive Oil
Note * this soup will get sweeter the longer it rests in the fridge, so don’t worry if it seems a bit too peppery - I’ve adjusted the recipe for it to balance out as the squash develops.
3lbs - 4lbs Butternut Squash. (1 large or 2 smalls)
6-8 cups Veg broth (I use Chicken broth)
- Reserve 2 cups for reheating
2 large Leeks - white & green parts thinly sliced
1 large White Onion - diced
2 medium Carrots - diced
2 medium Shallots - diced (same amount as onion)
6 cloves Garlic - crushed
4 Sage sprigs
1 Bouquet Garni ( in cheesecloth wrap: 8 sprigs Thyme, 4 sprigs Parsley, 2 Bay leaves, ½ tsp Black Peppercorns)
4 Tbsp Olive Oil Blend -or- Canola Oil
4 Tbsp Unsalted Butter
2 Tbsp Honey
1 tsp Cayenne Pepper
½ tsp ground Nutmeg
Salt & Ground Pepper - plenty! Don’t be stingy!
Chopped Chives & Olive Oil
Note * this soup will get sweeter the longer it rests in the fridge, so don’t worry if it seems a bit too peppery - I’ve adjusted the recipe for it to balance out as the squash develops.
How it’s done
Read all the way thru first so you know what’s next as it comes.
This is very easy to make though it takes time, and time is what you need to make it perfect.
-
Preheat oven to *350F. Line a baking sheet with foil.
-
Cut off the neck of squash - about 2-3 inches from top off, set aside.
-
Cut the Squash in half long wise.
-
Use a spoon and scrape out all seeds out and stringy bits, throw away.
-
Using ½ the oil, coat the flesh of the squash, and generously season with salt and fresh ground pepper.
-
Cut a small insert in the squash’s center, and tuck a sprig of sage in the center of each halve.

-
Flip over, flesh side down, skin up. Roast 1 hour or until tender.

-
Meanwhile, remove skin from the squash neck, using a knife. Don’t get crazy or cut yourself, just cut the edges like you would crust off bread. Then cut into small dice - uniformly for cooking, don’t worry if not perfect, you’ll puree it later.

-
In a Stock Pot - put remainder oil over Med-High. Add the onions, shallots, carrots, and leeks. Cook until tender, stirring often. (about 8 minutes.)
-
Add Squash, garlic, red pepper, 2 tsp salt, ½ tsp pepper - cook another 5 minutes. Watch out for garlic and squash - not to burn - turn heat down if need. Now add honey - cook another 3 minutes.

-
Finally add stock and Bouquet Garni - bring to a simmer, cook for another 25 minutes, stir occasionally.
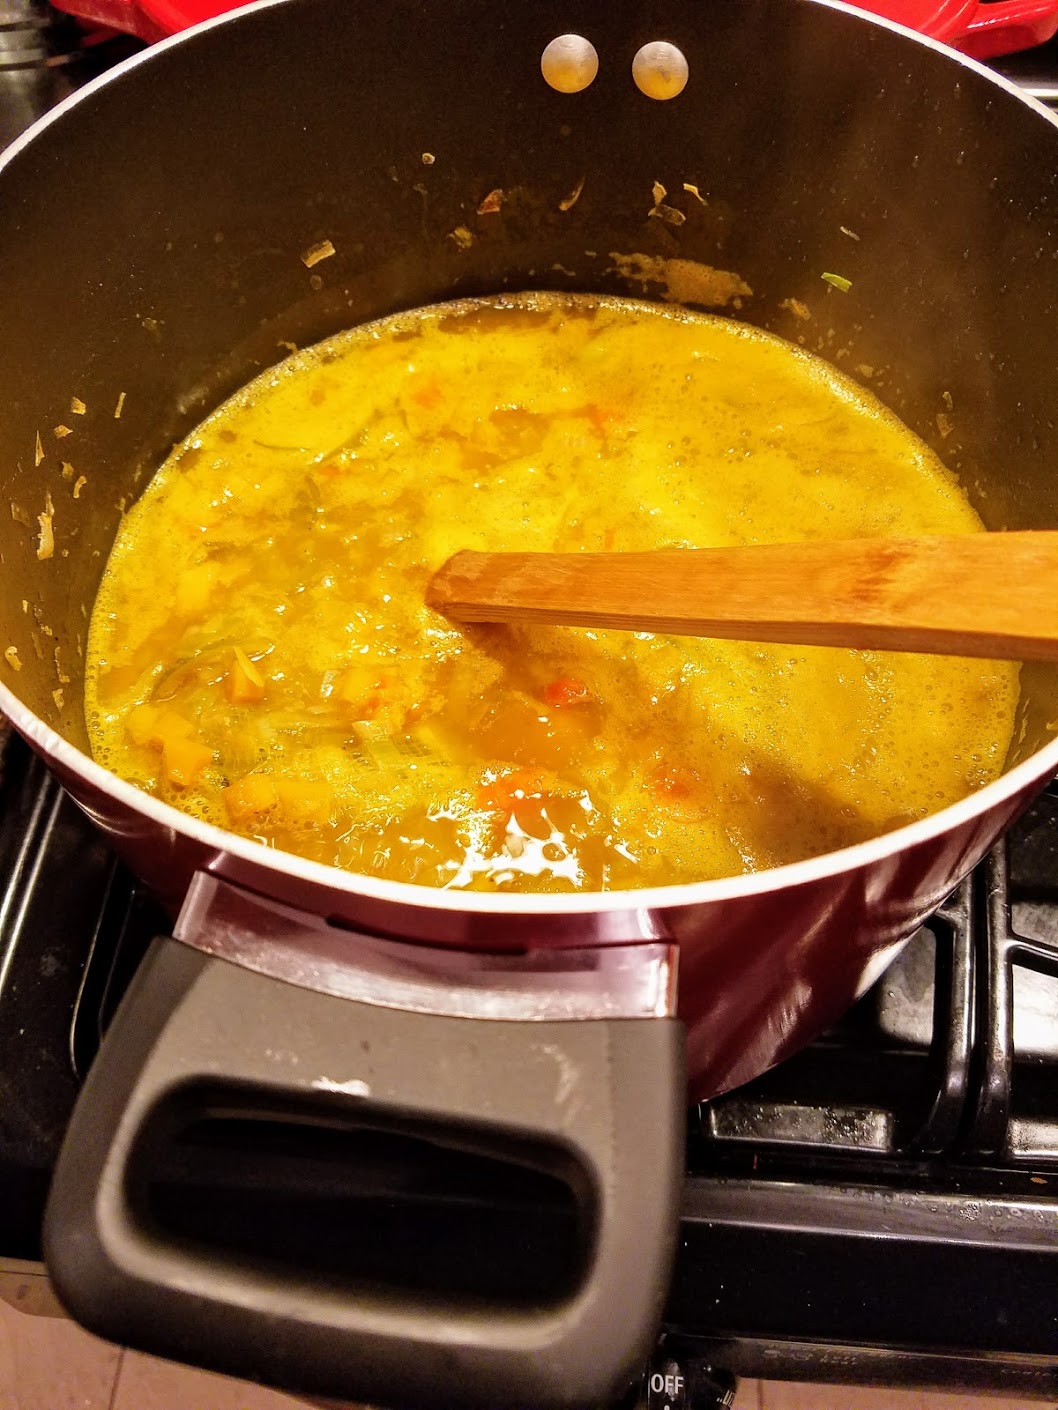
-
Once the roasted Squash has finished cooking, and is cool enough to handle, remove flesh with a spoon, throwing the sage and skin away.
 Try not to eat it all now!

-
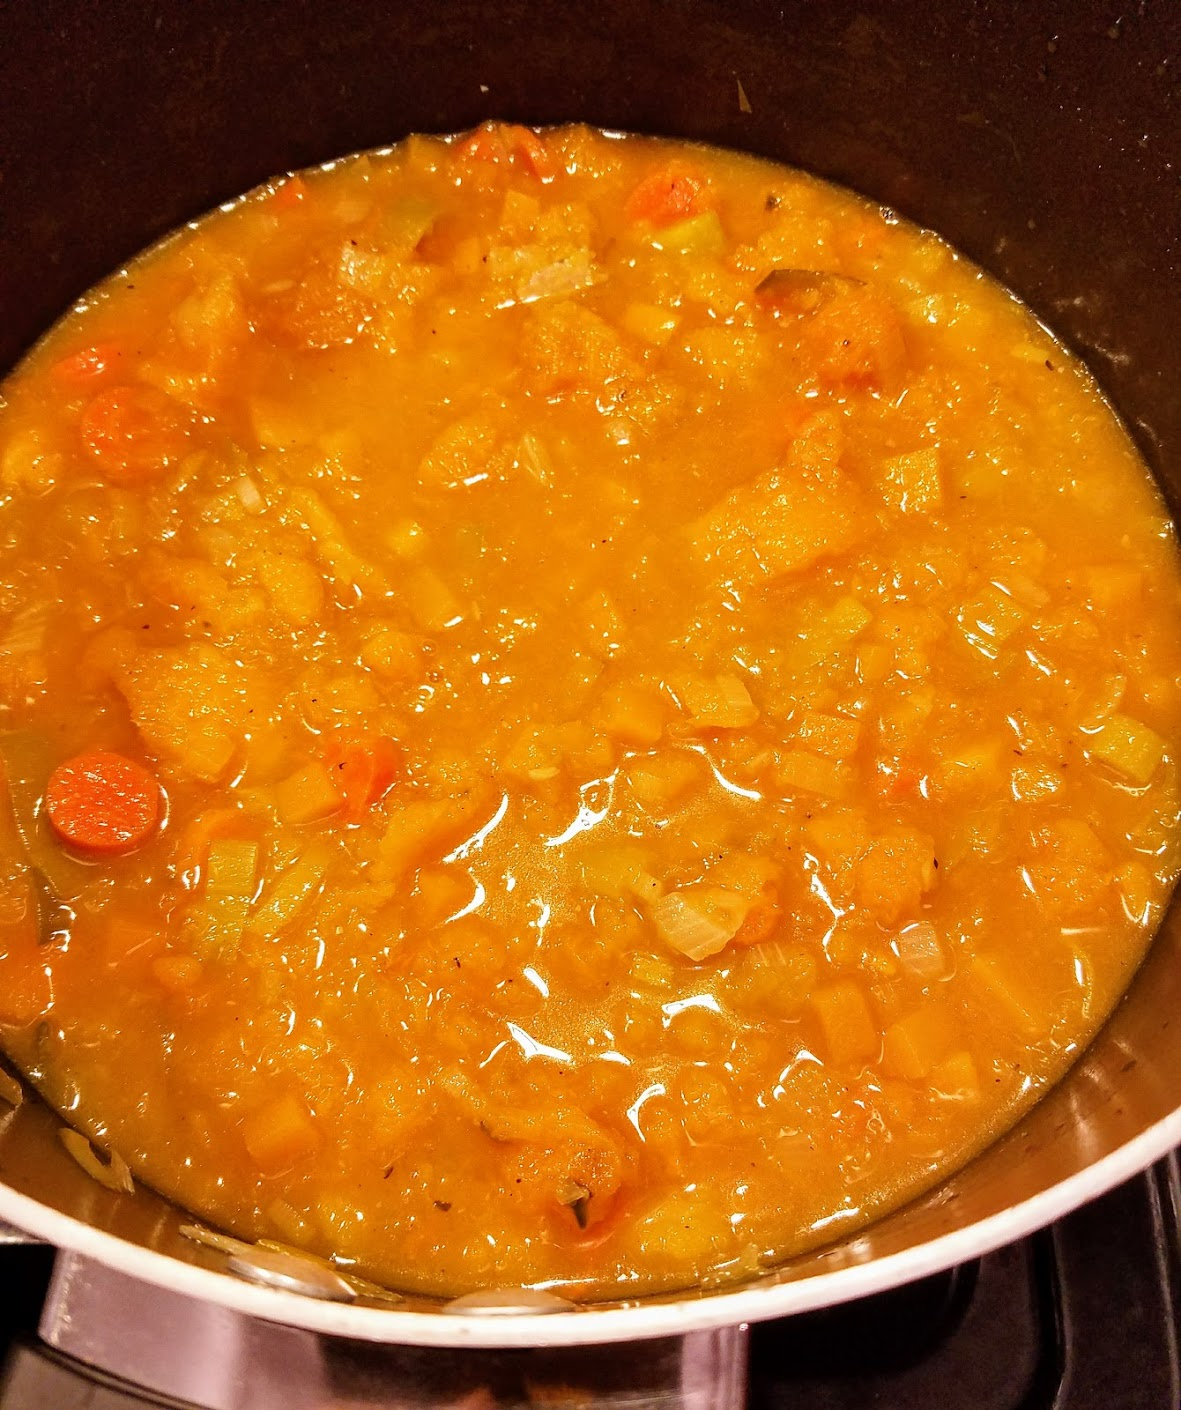
Put the roasted squash in the stockpot (after step 6 is completed.) Gently simmer for another 30 minutes letting all flavors meld together.
-
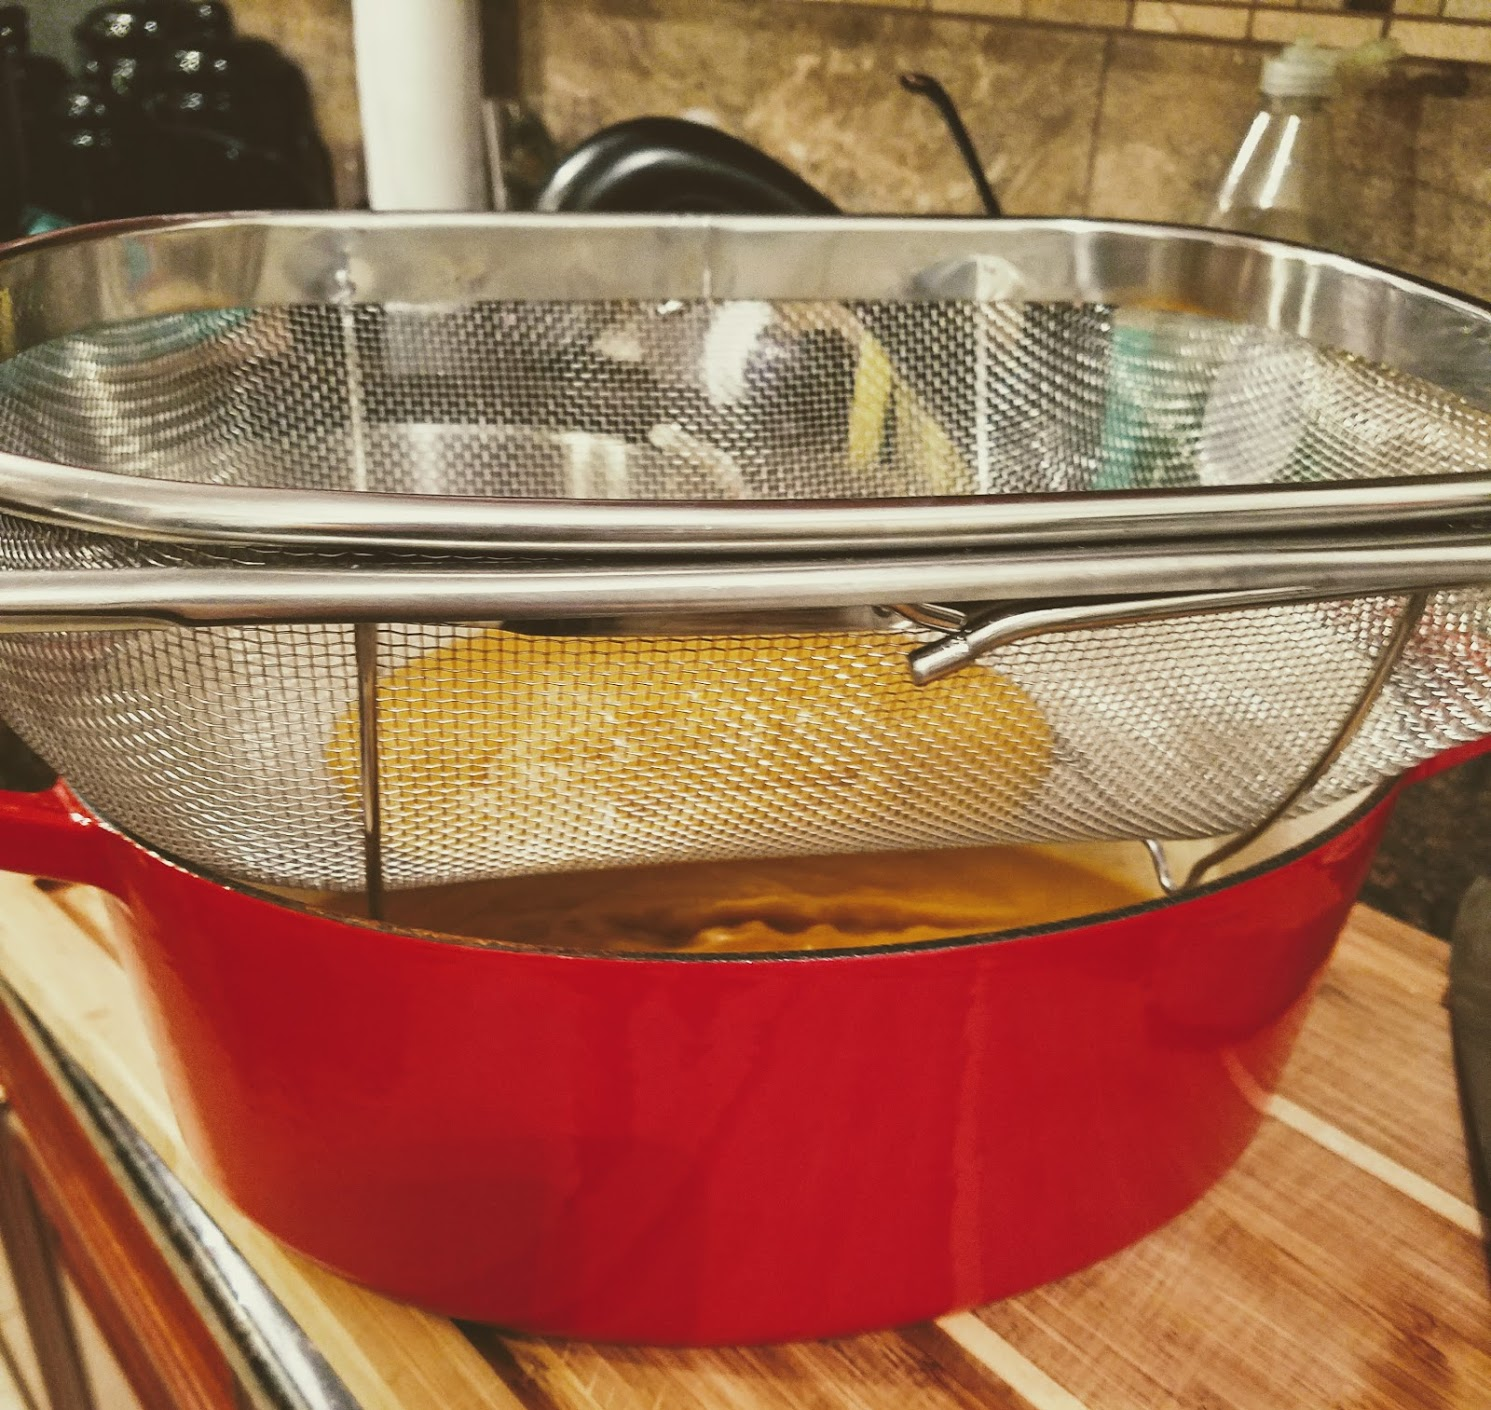
Once finished remove bouquet garni, and then puree soup in batches.
Be careful when blending hot soup! Make sure to use a cup to pour into blender, do not fill over ⅔ full, and make sure lid is on tight. Do not release any part of the top until liquid has completely stopped moving.

-
Take a fine sieve, or tamis, or strainer - thin as you have, pour soup thru into clean pot.
-
Taste for salt & pepper, adjust.

-
If reheating later - cool, cover, and place in fridge. Once ready to serve, add additional stock if needed then continue from here. If continuing on, put over heat until very gently simmers. Continue to stir not to burn bottom or sides.
-
NOW is the last chance to check for salt and pepper until you eat it. The brown butter will finish and make the dish rich and creamy with a hint of nutty from the hazelnut butter. This will add a whole new dimension to the soup.

-
When ready to serve: In a saute pan take butter over med-high eat, melt and watch as is turns hazelnut brown - swirling with handle gently until bubbles dissolve and butter has browned. Remove immediately after hazelnut brown or it will burn very fast at this point.
-
Take the butter and pour over soup, getting all the brown bits on the pan. Turn heat off. Stir soup gently until all butter is incorporated.

-
Plating: Put in your shooter cups, or soup bowls, while hot.
-
Use a spoon or put in a ziplock bag, cut the corner, and use as a pastry bag to pipe out dollop of cream.
-
Drizzle olive oil, and sprinkle chives.
Your finished! You’ve done it! Yes this is a very long process, but a gorgeous dish well worth it and one to be proud of! I hope this makes it to your holiday or seasonal traditions, as it has mine.
Cheers!
 #ButternutSquashSoup #Vegetarian #Vegan #GlutenFree #DIYSoup #Thanksgiving #FallDishes #Autumn #HolidayMenu #ChefCaylena #FoodPorn # FoodStyling #PartyFood #Entertaining #Soup
Read all the way thru first so you know what’s next as it comes.
This is very easy to make though it takes time, and time is what you need to make it perfect.
Preheat oven to *350F. Line a baking sheet with foil.
Cut off the neck of squash - about 2-3 inches from top off, set aside.
Cut the Squash in half long wise.
- Use a spoon and scrape out all seeds out and stringy bits, throw away.
- Using ½ the oil, coat the flesh of the squash, and generously season with salt and fresh ground pepper.
- Cut a small insert in the squash’s center, and tuck a sprig of sage in the center of each halve.
Flip over, flesh side down, skin up. Roast 1 hour or until tender.
Meanwhile, remove skin from the squash neck, using a knife. Don’t get crazy or cut yourself, just cut the edges like you would crust off bread. Then cut into small dice - uniformly for cooking, don’t worry if not perfect, you’ll puree it later.
In a Stock Pot - put remainder oil over Med-High. Add the onions, shallots, carrots, and leeks. Cook until tender, stirring often. (about 8 minutes.)
Add Squash, garlic, red pepper, 2 tsp salt, ½ tsp pepper - cook another 5 minutes. Watch out for garlic and squash - not to burn - turn heat down if need. Now add honey - cook another 3 minutes.
Finally add stock and Bouquet Garni - bring to a simmer, cook for another 25 minutes, stir occasionally.
Once the roasted Squash has finished cooking, and is cool enough to handle, remove flesh with a spoon, throwing the sage and skin away.
Put the roasted squash in the stockpot (after step 6 is completed.) Gently simmer for another 30 minutes letting all flavors meld together.
Once finished remove bouquet garni, and then puree soup in batches.
Be careful when blending hot soup! Make sure to use a cup to pour into blender, do not fill over ⅔ full, and make sure lid is on tight. Do not release any part of the top until liquid has completely stopped moving.
Take a fine sieve, or tamis, or strainer - thin as you have, pour soup thru into clean pot.
Taste for salt & pepper, adjust.
If reheating later - cool, cover, and place in fridge. Once ready to serve, add additional stock if needed then continue from here. If continuing on, put over heat until very gently simmers. Continue to stir not to burn bottom or sides.
NOW is the last chance to check for salt and pepper until you eat it. The brown butter will finish and make the dish rich and creamy with a hint of nutty from the hazelnut butter. This will add a whole new dimension to the soup.
When ready to serve: In a saute pan take butter over med-high eat, melt and watch as is turns hazelnut brown - swirling with handle gently until bubbles dissolve and butter has browned. Remove immediately after hazelnut brown or it will burn very fast at this point.
- Take the butter and pour over soup, getting all the brown bits on the pan. Turn heat off. Stir soup gently until all butter is incorporated.
Plating: Put in your shooter cups, or soup bowls, while hot.
- Use a spoon or put in a ziplock bag, cut the corner, and use as a pastry bag to pipe out dollop of cream.
- Drizzle olive oil, and sprinkle chives.
Your finished! You’ve done it! Yes this is a very long process, but a gorgeous dish well worth it and one to be proud of! I hope this makes it to your holiday or seasonal traditions, as it has mine.
Cheers!
Cheers!